The question
Over on Mastodon Pete Jones asked the following:
[…] I’ll jump straight to my noob questions which I’m hoping the #Rstats community can help me answer:
- Does anyone have any good recommendations for primers/video tutorials etc that are particularly geared towards (social science) research uses of containers?
- I can see how containers make sense for sharing your research environment at the end of a project for reproducibility, but how sensible is it to be doing all your iterating and exploratory stuff inside a container during the research? Do folks just do all that on their host system and then containerise it when they’re done?
- What’s the advantage of using, say, Apptainer versus podman versus something like rix? There seems to be a lot of overlap so it’s hard to know which one to dive into. For context, my coding work is almost entirely in the form of interactive sessions throwing stuff at the REPL and making data visualisations etc, and rarely a scripts-as-jobs type of workflow. In other words, I want to be sat inside a command line environment writing and evaluating code on the fly.
My response was basically that it’s straightforward-ish to use an image with RStudio Server, or VS Code. That’s how I work these days, barely touching the system installation of R.
It turns out that Pete uses Neovim as his IDE, so those images aren’t that useful. Thankfully, he recently wrote a nice blog post specifically about using Neovim for interactive R and Quarto work. Reading over that post again, and looking at his nvim config files, the desire to prove it was possible took me over.
A couple of days later I’m happy to say it is possible. The rest of this post is dedicated to explaining how.
Terminology
Containers aren’t tied to Docker, like most people think. There’s an open source alternative called Podman, and that’s what I used to build and run the container in question. Podman is essentially a drop-in replacement for Docker.
I also refer to the recipe for the container image not as a Dockerfile, but a Containerfile.
The Containerfile explanation
Here it is in full.
One note to mention is that I haven’t consistently pinned versions throughout. That would definitely be worthwhile, but it takes a bit of time and I don’t have it right now.
From Pete’s config, I knew he would need Python (because the radian R REPL is written in it), R, Quarto, and of course, Neovim. You can see that installing and configuring these different tools happen in short blocks, most of which are heredocs. It’s fine to have small scripts that get copied in and run instead, but I used heredocs so that everything is together in the same file.
FROM docker.io/library/python:3.13-bookworm

# Python setup. Makes a venv and sets it as the default Python interpreter
ENV VIRTUAL_ENV=/root/.venv
RUN python -m venv $VIRTUAL_ENV
ENV PATH="$VIRTUAL_ENV/bin:$PATH"

# Install radian, a Julia-inspired R REPL written in Python
RUN pip install -U radian

ENV R_VERSION="4.5.0"
ENV QUARTO_VERSION="1.7.29"

RUN <<EOF
# Install R
# Taken from https://github.com/r-lib/rig?tab=readme-ov-file#installing-rig-on-linux-

# Get their certificate
curl -L https://rig.r-pkg.org/deb/rig.gpg -o /etc/apt/trusted.gpg.d/rig.gpg
sh -c 'echo "deb http://rig.r-pkg.org/deb rig main" > /etc/apt/sources.list.d/rig.list'
apt-get update

# Now rig is available to install
apt-get install r-rig

# Install this version of R
rig add ${R_VERSION}

echo "options(repos = c(CRAN = 'https://packagemanager.posit.co/cran/__linux__/bookworm/latest'))\n\n" >> ~/.Rprofile
Rscript -e "options(warn = 2); pak::pak(c('knitr', 'rmarkdown', 'languageserver', 'nx10/httpgd'))"
EOF

RUN <<EOF
# Set up the R graphics driver
echo "if (interactive()) {\n
  if ('httpgd' %in% .packages(all.available = TRUE)) {\n
    options(device = function(...) {\n
      httpgd::hgd(host = '0.0.0.0', port = 9001, token = FALSE)\n
    })\n
  }\n
}\n\n" >> ~/.Rprofile
EOF

RUN <<EOF
# Install Quarto.
# Slightly modified from
# https://docs.posit.co/resources/install-quarto.html

mkdir -p /opt/quarto/${QUARTO_VERSION}

curl -o quarto.tar.gz -L \
    "https://github.com/quarto-dev/quarto-cli/releases/download/v${QUARTO_VERSION}/quarto-${QUARTO_VERSION}-linux-amd64.tar.gz"

tar -zxvf quarto.tar.gz \
    -C "/opt/quarto/${QUARTO_VERSION}" \
    --strip-components=1

rm quarto.tar.gz

# Symlink so that `quarto` can be used as a command
ln -s /opt/quarto/${QUARTO_VERSION}/bin/quarto /usr/local/bin/quarto

# Verify successful installation
quarto check
EOF

# deno is required for one of the plugins
COPY --from=denoland/deno:bin /deno /usr/local/bin/deno

RUN <<EOF
# Neovim plugin system deps

apt-get update
apt-get install -y --no-install-recommends ripgrep fd-find

# Instructions for fd from: https://github.com/sharkdp/fd?tab=readme-ov-file#on-debian
mkdir -p ~/.local/bin/fd
ln -s $(which fdfind) ~/.local/bin/fd
echo 'export PATH="$PATH:/$HOME/.local/bin"' >> ~/.bashrc
EOF

RUN <<EOF
# Get Neovim config

mkdir -p ~/.config/nvim
curl -o config.tar.gz -L "https://codeberg.org/pjphd/neovim_config/archive/main.tar.gz"
tar -zxvf config.tar.gz -C ~/.config/nvim --strip-components=1

rm config.tar.gz
EOF

RUN <<EOF
# Install Neovim
# Taken from https://github.com/neovim/neovim/blob/master/INSTALL.md#pre-built-archives-2

curl -LO https://github.com/neovim/neovim/releases/latest/download/nvim-linux-x86_64.tar.gz
rm -rf /opt/nvim
tar -C /opt -xzf nvim-linux-x86_64.tar.gz
echo 'export PATH="$PATH:/opt/nvim-linux-x86_64/bin"' >> ~/.bashrc

rm nvim-linux-x86_64.tar.gz
EOF

# Tidy up apt
RUN apt clean && rm -rf /var/lib/apt/lists/*

CMD /bin/bash
Python
FROM docker.io/library/python:3.13-bookworm

# Python setup. Makes a venv and sets it as the default Python interpreter
ENV VIRTUAL_ENV=/root/.venv
RUN python -m venv $VIRTUAL_ENV
ENV PATH="$VIRTUAL_ENV/bin:$PATH"

# Install radian, a Julia-inspired R REPL written in Python
RUN pip install -U radian
I used an “official” Python base image with version 3.13, and Debian Bookworm as the Linux distro. At time of writing bookworm is the latest release of Debian.
Python no longer allows you to install packages into the system version of Python. I think that’s fine - virtual environments are great (I wish R’s ecosystem was better in this regard). So here, I make a venv and add that version of Python to the container’s PATH. This means when you invoke python or pip it uses the venv. If you don’t take the step of adding it to the PATH your subsequent RUN commands, e.g. pip installing requirements, will use the system Python installation. Not a lot of people know this so I thought it was worth pointing out. Handily, this also means you never need to source /venv/bin/activate.
R
RUN <<EOF
# Install R
# Taken from https://github.com/r-lib/rig?tab=readme-ov-file#installing-rig-on-linux-

# Get their certificate
curl -L https://rig.r-pkg.org/deb/rig.gpg -o /etc/apt/trusted.gpg.d/rig.gpg
sh -c 'echo "deb http://rig.r-pkg.org/deb rig main" > /etc/apt/sources.list.d/rig.list'
apt-get update

# Now rig is available to install
apt-get install r-rig

# Install this version of R
rig add ${R_VERSION}

echo "options(repos = c(CRAN = 'https://packagemanager.posit.co/cran/__linux__/bookworm/latest'))\n\n" >> ~/.Rprofile
Rscript -e "options(warn = 2); pak::pak(c('knitr', 'rmarkdown', 'languageserver', 'nx10/httpgd'))"
EOF

RUN <<EOF
# Set up the R graphics driver
echo "if (interactive()) {\n
  if ('httpgd' %in% .packages(all.available = TRUE)) {\n
    options(device = function(...) {\n
      httpgd::hgd(host = '0.0.0.0', port = 9001, token = FALSE)\n
    })\n
  }\n
}\n\n" >> ~/.Rprofile
EOF
I use rig to install R. Then, I set the CRAN repo to the Posit Public Package Manager, specifically the version with binaries for Bookworm. This means the packages don’t need to build from source so the installation process is nice and fast.
Rig comes with pak, a package installation manager for R. This fantastic package can find and install Linux system dependencies for R packages, which is a real blessing when making your own container. Here I just install the packages I know are required for Quarto (knitr, rmarkdown) and Neovim (languageserver, httpgd).
Speaking of httpgd, I add some configuration to the Rprofile for this. The purpose of this package is to offer a graphics device, for viewing plots and HTML. Basically, the browser on your computer can be used to view images provided by httpgd while it runs inside the container.
Quarto
RUN <<EOF
# Install Quarto.
# Slightly modified from
# https://docs.posit.co/resources/install-quarto.html

mkdir -p /opt/quarto/${QUARTO_VERSION}

curl -o quarto.tar.gz -L \
    "https://github.com/quarto-dev/quarto-cli/releases/download/v${QUARTO_VERSION}/quarto-${QUARTO_VERSION}-linux-amd64.tar.gz"

tar -zxvf quarto.tar.gz \
    -C "/opt/quarto/${QUARTO_VERSION}" \
    --strip-components=1

rm quarto.tar.gz

# Symlink so that `quarto` can be used as a command
ln -s /opt/quarto/${QUARTO_VERSION}/bin/quarto /usr/local/bin/quarto

# Verify successful installation
quarto check
EOF
There’s nothing particularly special going on here. I basically just followed Posit’s instructions.
Neovim dependencies
# deno is required for one of the plugins
COPY --from=denoland/deno:bin /deno /usr/local/bin/deno

RUN <<EOF
# Neovim plugin system deps

apt-get update
apt-get install -y --no-install-recommends ripgrep fd-find

# Instructions for fd from: https://github.com/sharkdp/fd?tab=readme-ov-file#on-debian
mkdir -p ~/.local/bin/fd
ln -s $(which fdfind) ~/.local/bin/fd
echo 'export PATH="$PATH:/$HOME/.local/bin"' >> ~/.bashrc
EOF
deno is a system dep of peek.nvim, and thankfully they had straightforward instructions that allowed me to copy the binary from one of their own container images.
Pretty much everyone using Neovim will use a plugin called Telescope, which requires fd, and I think ripgrep too.
Neovim config
RUN <<EOF
# Get Neovim config

mkdir -p ~/.config/nvim
curl -o config.tar.gz -L "https://codeberg.org/pjphd/neovim_config/archive/main.tar.gz"
tar -zxvf config.tar.gz -C ~/.config/nvim --strip-components=1

rm config.tar.gz
EOF
This grabs Pete’s config files from Codeberg and puts them into the expected place in the file system.
Neovim
RUN <<EOF
# Install Neovim
# Taken from https://github.com/neovim/neovim/blob/master/INSTALL.md#pre-built-archives-2

curl -LO https://github.com/neovim/neovim/releases/latest/download/nvim-linux-x86_64.tar.gz
rm -rf /opt/nvim
tar -C /opt -xzf nvim-linux-x86_64.tar.gz
echo 'export PATH="$PATH:/opt/nvim-linux-x86_64/bin"' >> ~/.bashrc

rm nvim-linux-x86_64.tar.gz
EOF
Again, pretty straightforward - followed instructions provided by the Neovim maintainers.
Tidy and cmd
# Tidy up apt
RUN apt clean && rm -rf /var/lib/apt/lists/*

CMD /bin/bash
The lists of available packages are just bloat at this point, so I get rid of them. And I add a new cmd, which is what gets run when the container is booted up. In this case it’s just bash, so that the user gets a flexible launch/base point to work from.
Build the container
This bit is really simple. In a terminal cd to the directory where the Containerfile lives. Then run:
podman build -t pete . --arch=linux/amd64It will take a minute or two depending on your internet and processing power.
pete is the name I’ve given the image. The . just means ‘look in the current directory for the Containerfile’. The --arch=linux/amd64 is to “set the architecture of the image to be built, and that of the base image to be pulled, if the build uses one, to the provided value instead of using the architecture of the build host”. I’m on an arm64 Macbook, which is the build host, but most of the things we’re installing into the image are explicitly the amd64 versions.
One thing to bear in mind is the “build context” when you build the image. All the files in the directory containing the Containerfile will get copied into the build context, so that they’ve available for the build. Podman will look like it’s frozen if you have large files in the build context. In reality, it’s copying them. You can either add them to a .Containerignore (aka .Dockerignore) or do the build in a different directory.
Run the container
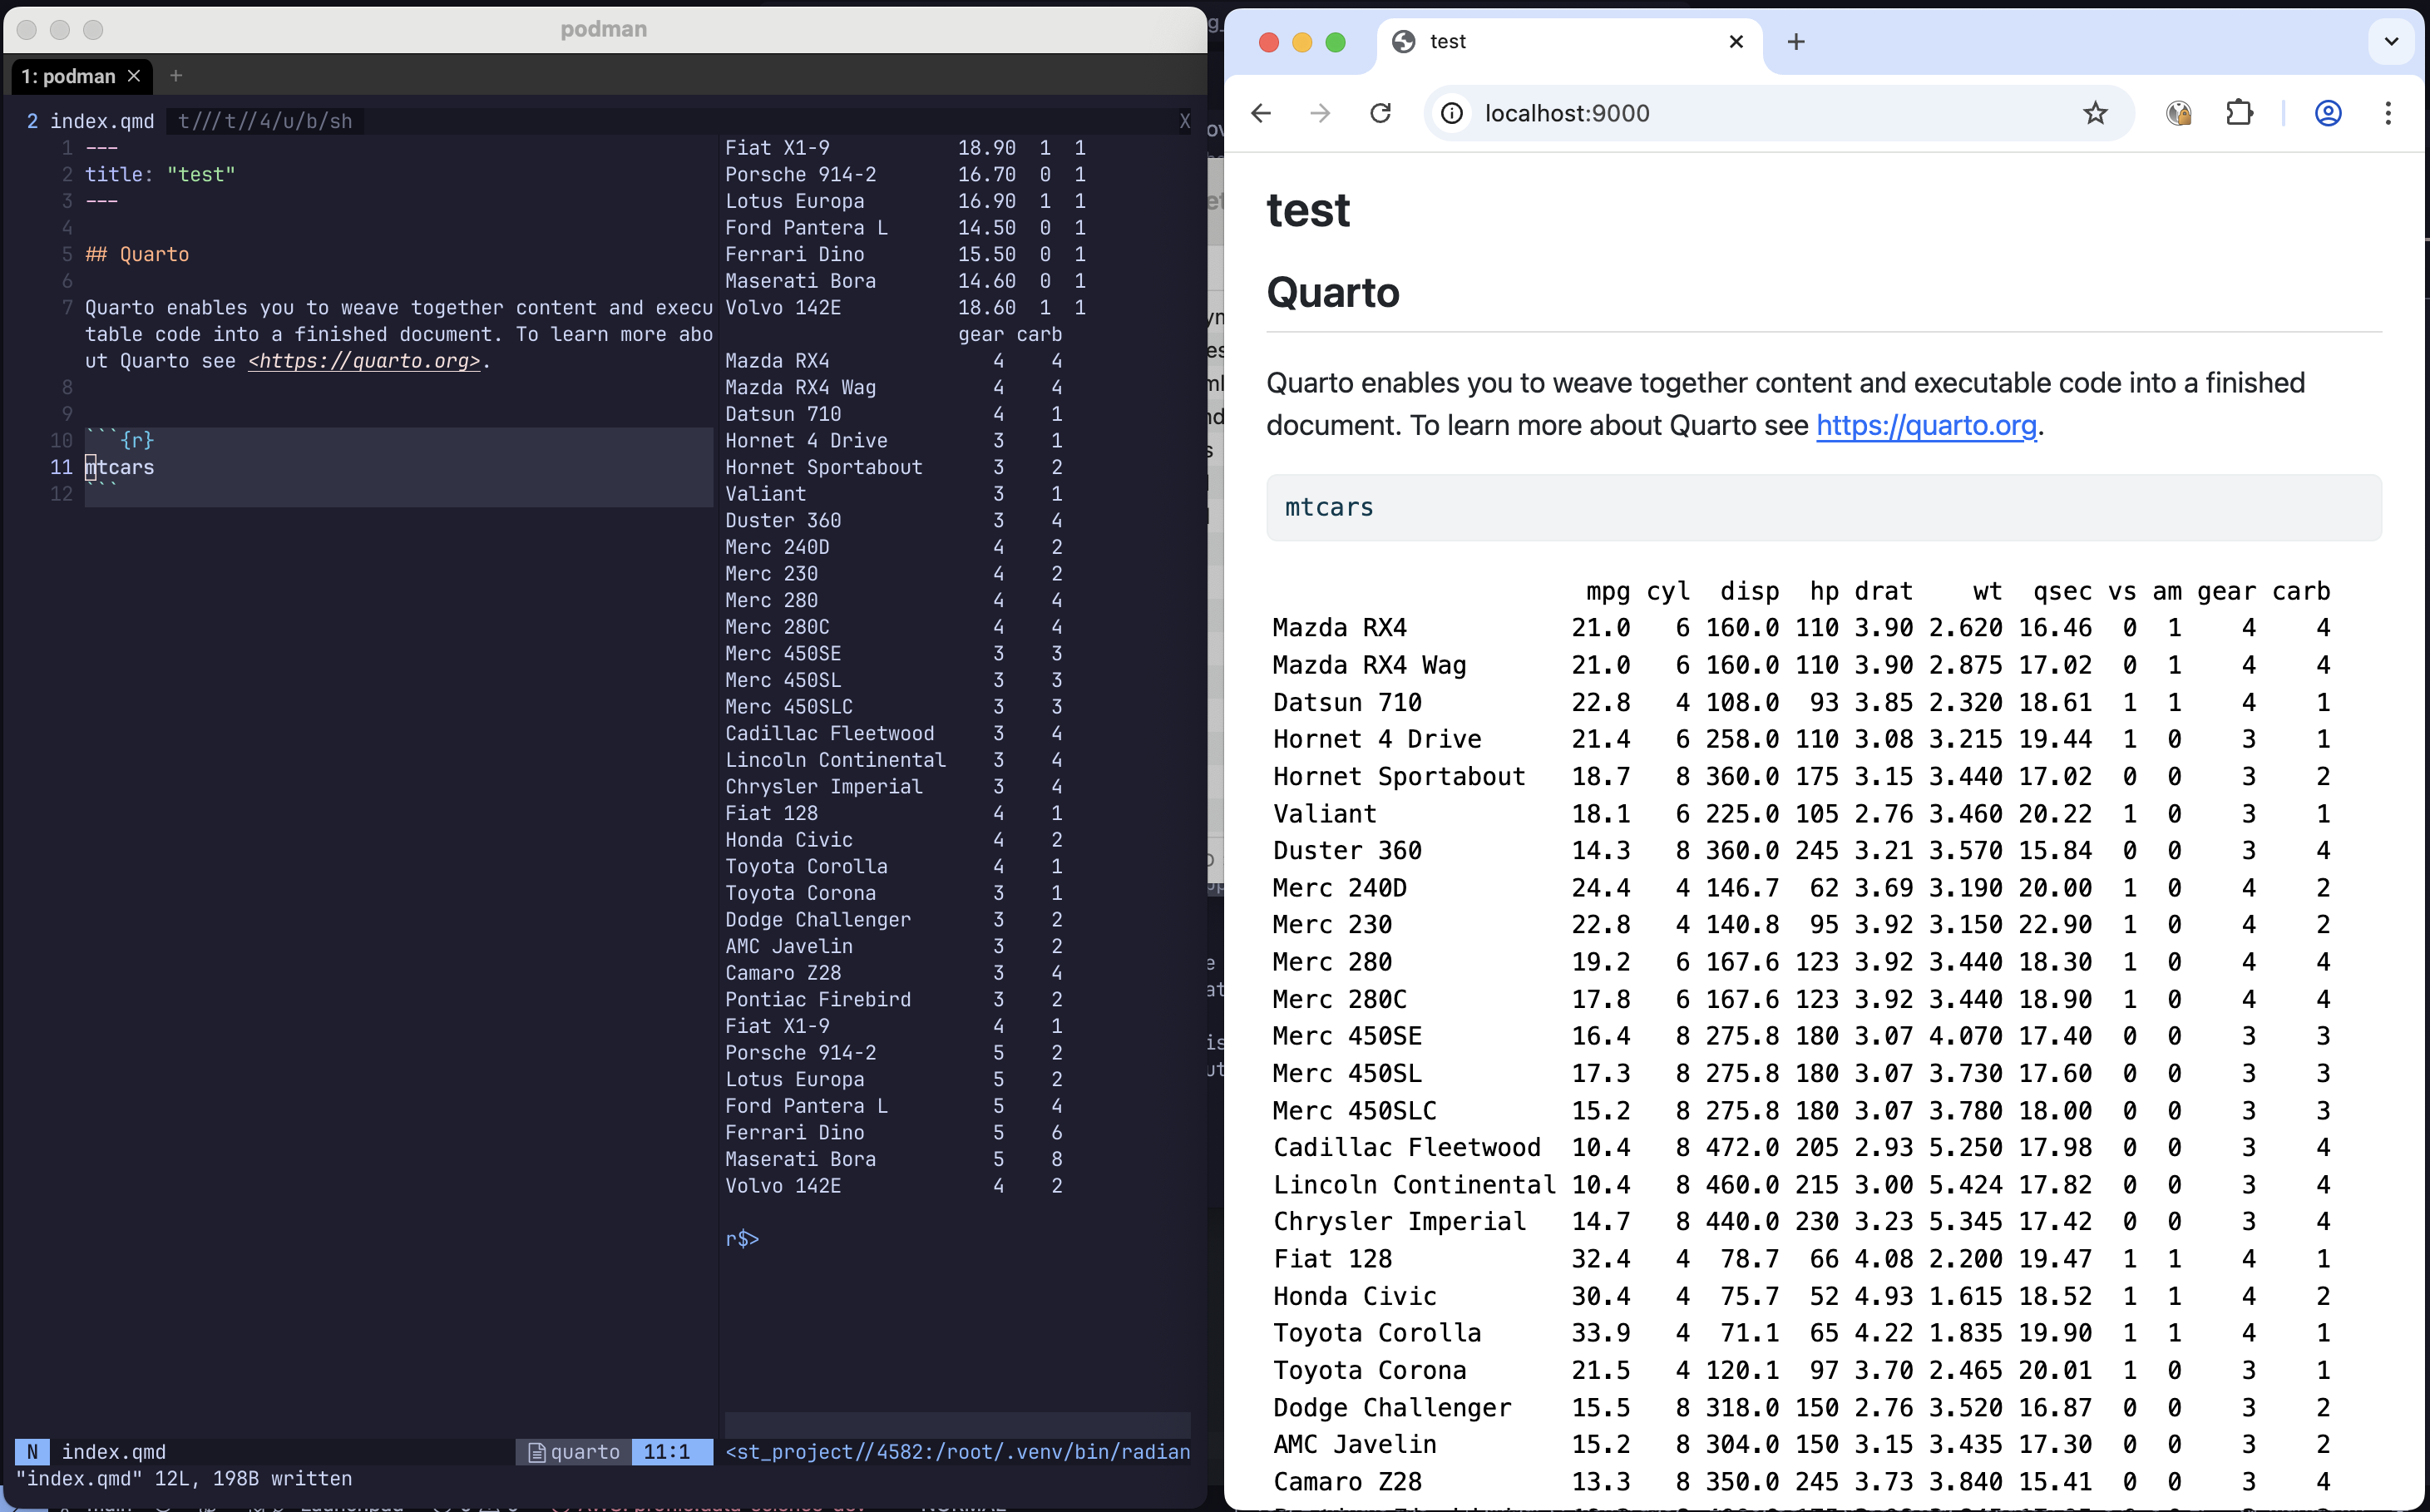
Before running, I made a tiny Quarto file in the same directory as the Containerfile, called index.qmd:
---
title: "test"
---

## Quarto

Quarto enables you to weave together content and executable code into a finished document. To learn more about Quarto see <https://quarto.org>.

```{r}
mtcars
```

```{r}
plot(mtcars)
```
This is when the magic happens.
In the terminal (from the directory with index.qmd) run:
podman run --rm -it -p 9000:9000 -p 9001:9001 -v ./:/test_project peteThe container will start. We’ve set it up to run with an interactive terminal, forwarding ports 9000 and 9001 from within the container to the same ports on the host machine, and also mounted the current directory to /test_project inside the container.
The ports will be used to preview the qmd file and for showing plots made during an interactive R session. The volume mounting means that we can edit the qmd file inside the container and the changes will persist on the host machine - in fact we can also make entirely new files in /test_project and they will appear on the host file system!
With the container running, start neovim:
nvimIt will take a moment to install all of the plugins and LSPs. When it’s done follow any prompts that come up.
Once finished, do :tabnew, then :terminal. Go into Insert mode and run:
quarto preview test_project/index.qmd --host 0.0.0.0 --port 9000In your web browser, go to localhost:9000. You should see a live preview of the Quarto document.
Now, in the other nvim tab, let’s :e test_project/index.qmd. Go ahead and change something in the file, and :w. Look at the browser and the doc should update right in front of you.
For the cherry on top, let’s start a REPL at the same time and view a plot. With the config at current time of writing localleader is set to Space. Do <localleader>rS, this should open a radian terminal. Now highlight the line of R code plot(mtcars) with Shift + V, then do <localleader>r followed by Return. Radian should say that it’s running a httpgd server. Go to your browser and in a new tab/window go to localhost:9001/live. There’s your plot!
This shows how Neovim with a plot viewer and Quarto live preview, plus a ‘live link’ between the container and host file systems is possible.
Is it worth it?
The short answer is, I’m not sure.
R itself is quite mature and so are many of its most well-used packages, so developing on your system and then putting the finished project into a container is fine. Creating a dev environment with a lot of dependencies, like in this case, is fairly involved. It’s also annoying that the Neovim packages have to install every time you start the container, though there may be a solution to that I’ve yet to find.
At the same time, once you have a couple of Containerfiles, like this dev one, and another that encapsulates the final project, you’ve got most of what you need for future projects. It’s also amazing how quickly we can adapt to slightly different workflows like this. I think it’s really cool that Neovim can offer the REPL and native terminal. I’m also a believer that the ephemeral nature of containers forces us to be a lot better about capturing code, and making sure it runs from start to end. Too often people rely heavily on the REPL and are scared to restart their IDE in case their analysis no longer works, for some reason.
Two extra learnings
Two extras things I learned during this process:
Ever wondered about what has gone into a base image that you are using? As in, what did the Containerfile / Dockerfile have in it? That’s possible to get. First run
podman image lsand note down the image id of the image you’re interested in. Then usepodman history --no-trunc image_id, whereimage_idis (you guessed it) the image id. The output isn’t clean like a Containerfile - it contains timestamps and suchlike - and it is in reverse order. But it’s still a good one to know, particularly if you find yourself in a situation like I did while making this post: The Containerfile disappeared after a forced laptop restart. Ten minutes of tedious reformatting later, all was repaired.How to close buffers. I used to open files in Neovim sometimes using the
:e(alias of:edit) command. I knew that these buffers had to be closed somehow but never figured it out. It’s actually very simple. You can list all buffers with:buffers. Then you can dodb #, where#is the number of the buffer to be closed.